DEC 2022 Update: The Pioneer worked pretty well but after 4 years I replaced with an Alpine Halo 11 iLXF511. This article is still relevant for some installation issues but the Alpine was much easier to install – basically plug-and-play since Critchfield offers a custom wiring harness. Times have changed I never used the DVD or offline GPS; the Alpine has neither.
My Sprinter RV (2019 LTV Unity CB) came with a basic radio and Becker Map Pilot.
So to be honest, I only turned it on once. I’m a technology bigot, and as soon as I saw the decades old interface and the lack of any modern features I switched it back off. To be fair, I have heard it does work, and if you are just interested in getting from point A to point B, it will probably work for you.
I need something nicer, and most specifically it has to have wireless Android Auto. My Google Pixel 3 already supports this, but soon everything will. My wife has an iPhone so the Apple CarPlay is useful too.
But I’d also like to have the built-in GPS. I’ve always refused to install these in my auto, as the maps and features become stale and out-of-date as soon as you drive off the lot.
I figure an RV is a special use-case. Some of the time we’ll be completely out of range of a mobile signal. Sure, a great feature of Google maps is you can preload the map, but if you unexpectedly find yourself with zero bars the in-panel nav is nice in a pinch.
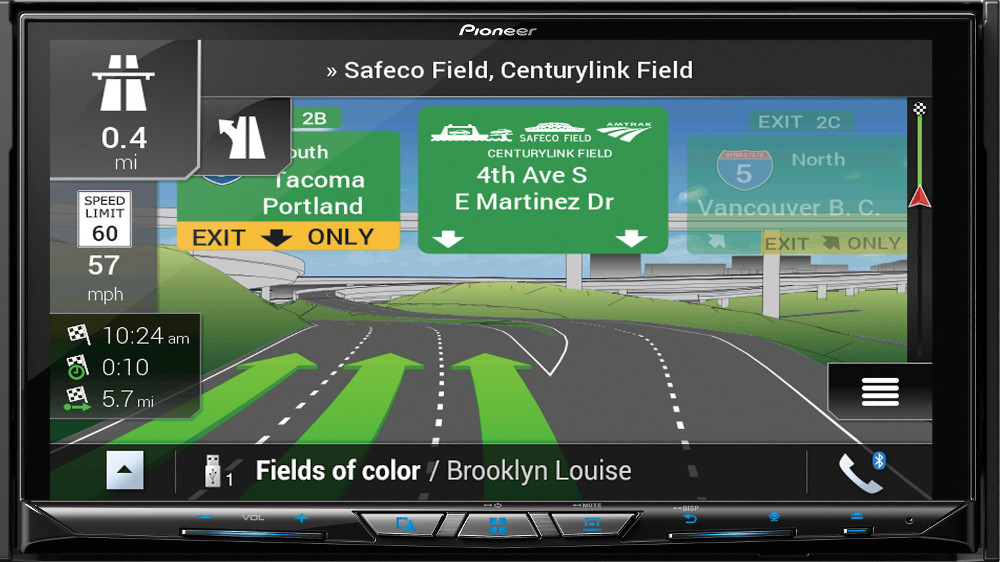
The unit I settled on after a lot of Internet research is the Pioneer AVIC-W8400NEX.
This seems like it will meet all my requirements. It has a few other features I like:
- Optional Sirius integration
- Capacitive Multipoint Motorized Touchscreen
- Dvd player (movies and audio, wish it were Bluray)
- Remote Control (I know i’ll probably never use it)
- Supports 2 cameras, and a range of input and output including HDMI and RCA jacks
Older Pioneer units have been well reviewed (with a few hiccups naturally). Its pricey, at $1,000, and that’s before you buy all the needed accessories like wiring harnesses and the like (or pay for professional installation).
So I have decided to install this myself, which I realize will be a bit of an exercise in masochism. Crutchfield, which is kind of authority on stuff like this, told me that had no info or idea about this, which gives me some pause.
Still, there are some threads on the Internet about installing previous Pioneer’s in Sprinters, and I have no doubt I can make it work one way or another, so I am ready to take the plunge. I’m only a bit nervous because nothing on the Internet seems to have a complete step by step guide and no confirmation that it will work for 2018 Sprinter.
Here are some good links I found in my search, for starters.
One bummer I see right away in my research is that the iDataLink Maestro adapter will not work with Mercedes – meaning a whole screen full of cool real time sensor info can’t be displayed, but maybe someday…
So without further ado I am ordering this. Amazon, as usual, will have it in my greedy hands in 2 days. And they did.
As I mentioned one of the worries I had about this project was, the companies that make the adapters and wires say it doesn’t work on a 2018 Sprinter. But I think they just can’t be bothered to update their websites more than every couple years, so we shall see..
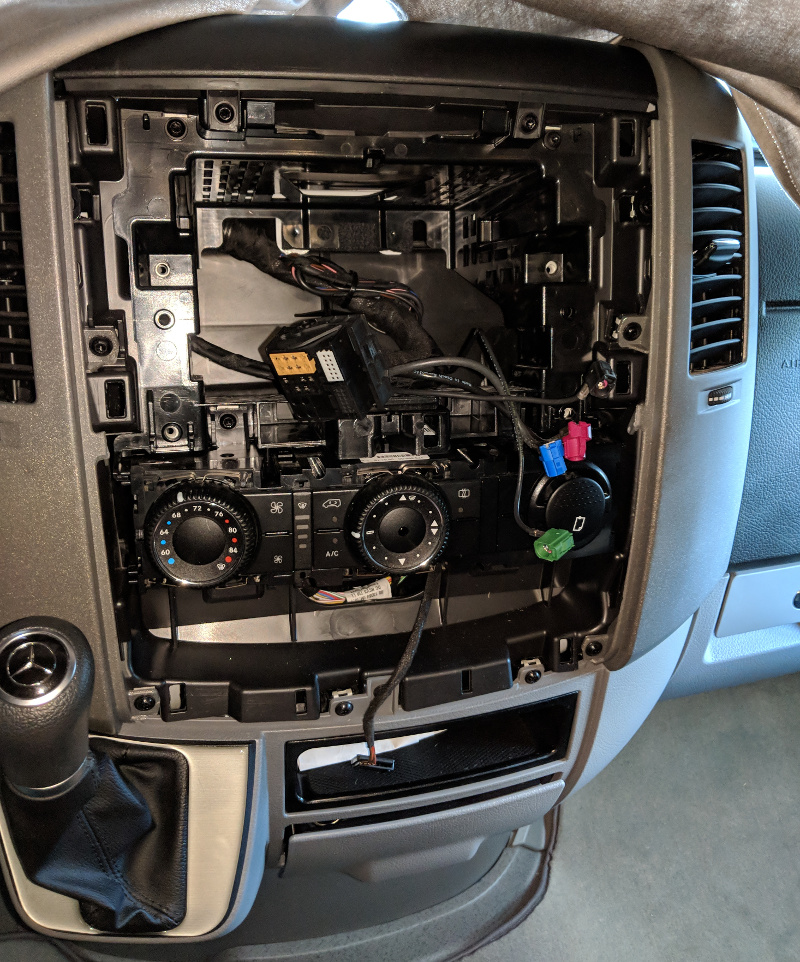
So for starters, here is what it looked like before:
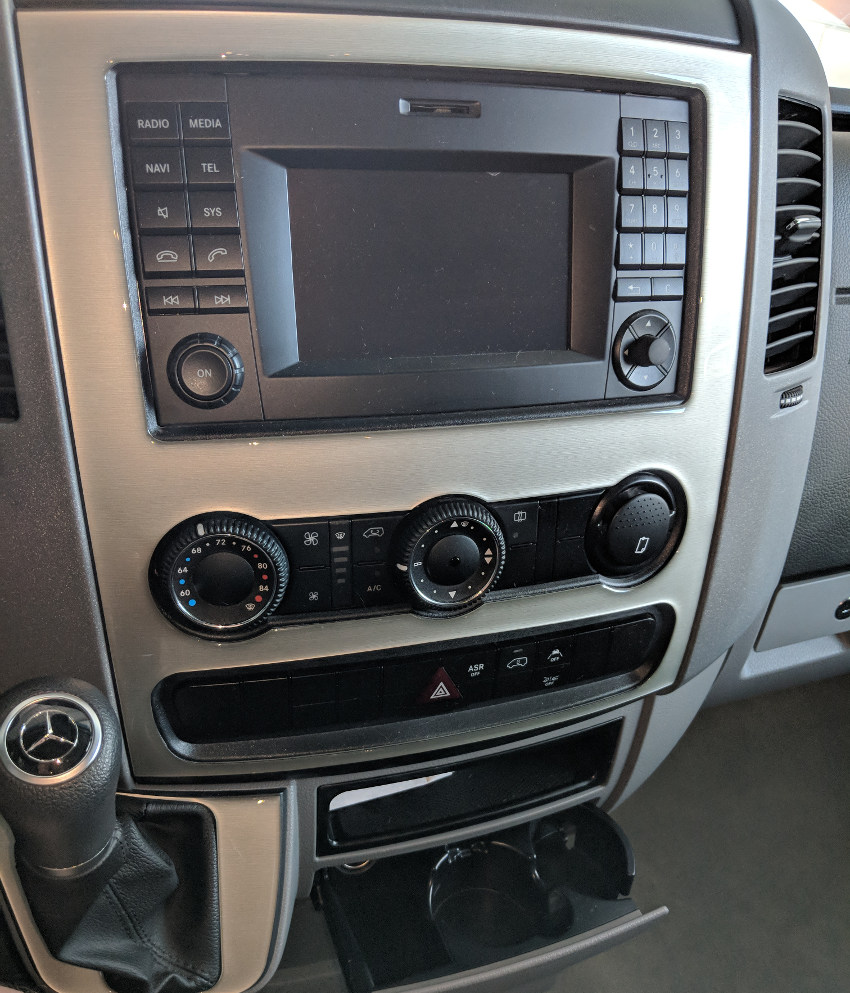
Thats a lot of buttons! I have to say, by the way, I just don’t understand why they build cars with hands-free speaker phones. Who would actually use these, unless you are driving by yourself? How revolting it must be for your passengers to have to hear both sides of a conversation while confined with you. But I digress…
So the first step is to pop that faceplate off with these nifty little orange panel pullers I got off Amazon. I just went slow and gentle and it was a piece of cake. A single wire connector at the bottom is unplugged next.
(It was around this moment that I remembered to first pop the vehicle ground from under the accelerator pedal, and you should too.)

After that, the radio is held in place with just 4 size 25 Torx screws.
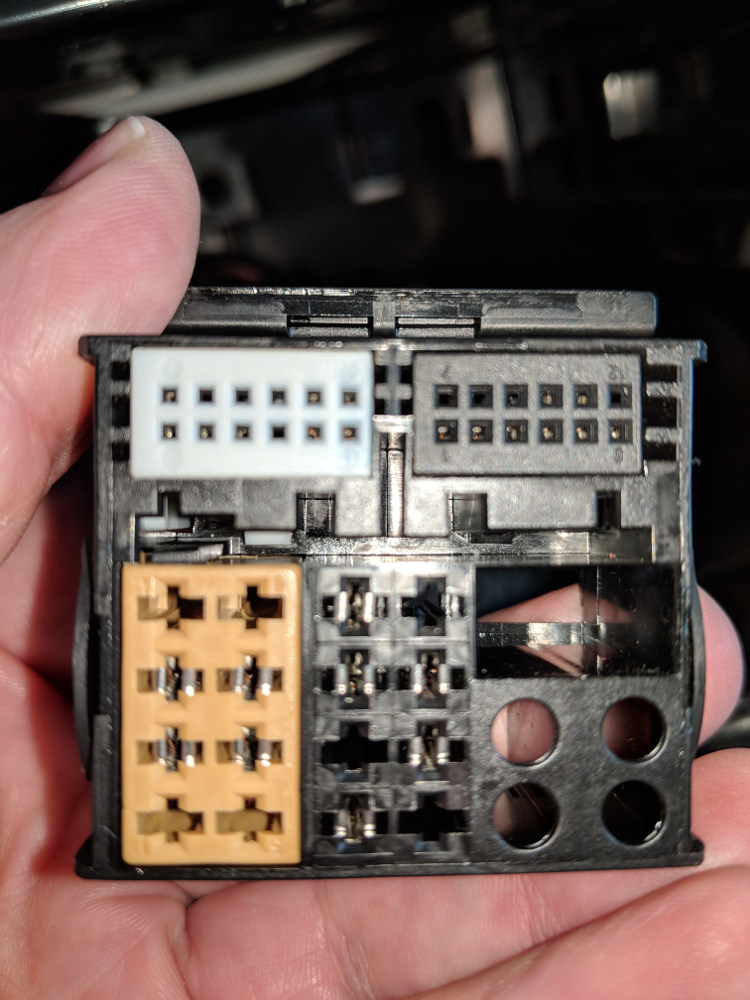
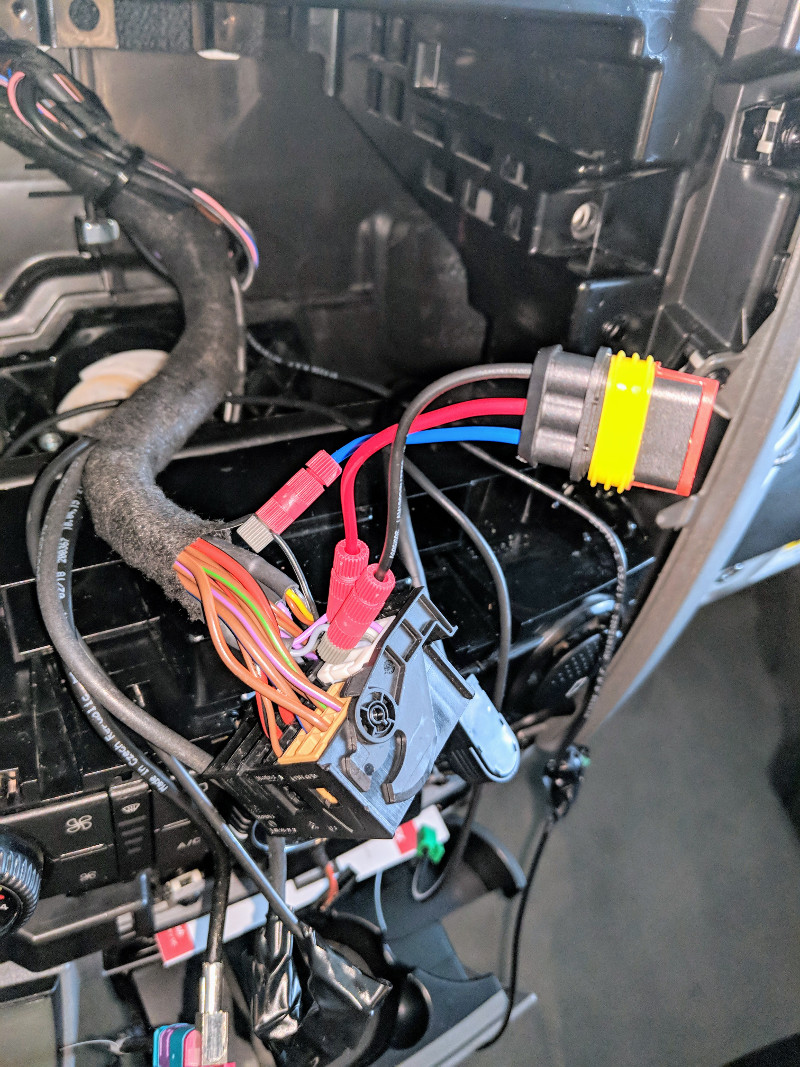
The back of the radio has 4 connectors for gps antenna, backup camera, etc, and a giant connector for everything else. There is a little locking connector on the later, after you squeeze the release you eject it by gently pulling the lever.
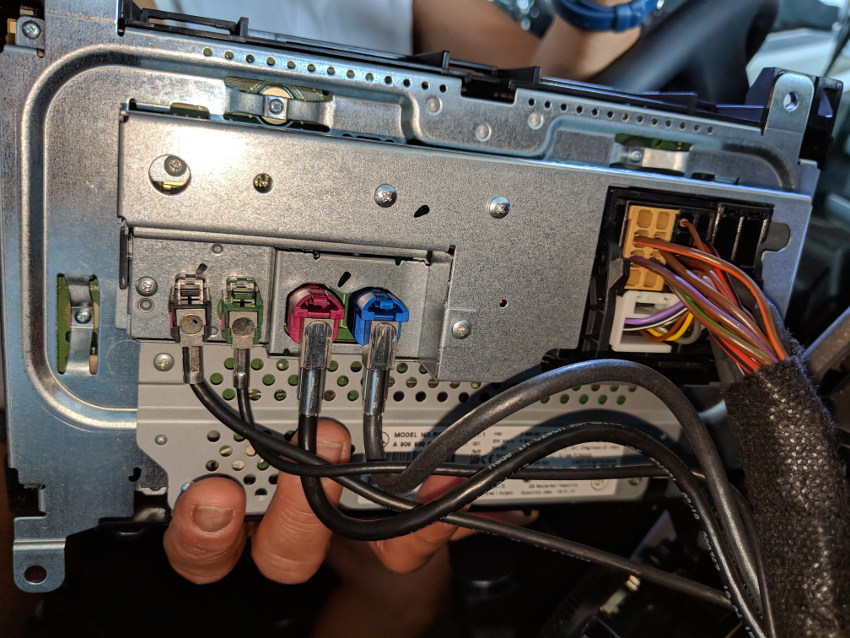
Interestingly, the aftermarket harness doesn’t use the entire top 2 rows of pins, which is the bulk of this plug. Presumably those pins include a bunch of stuff like the in-dash road name and direction display which I guess I’ll be losing.
So you end up with this view of your center console! Nice. I almost wanted to just send everything back and cancel the project.
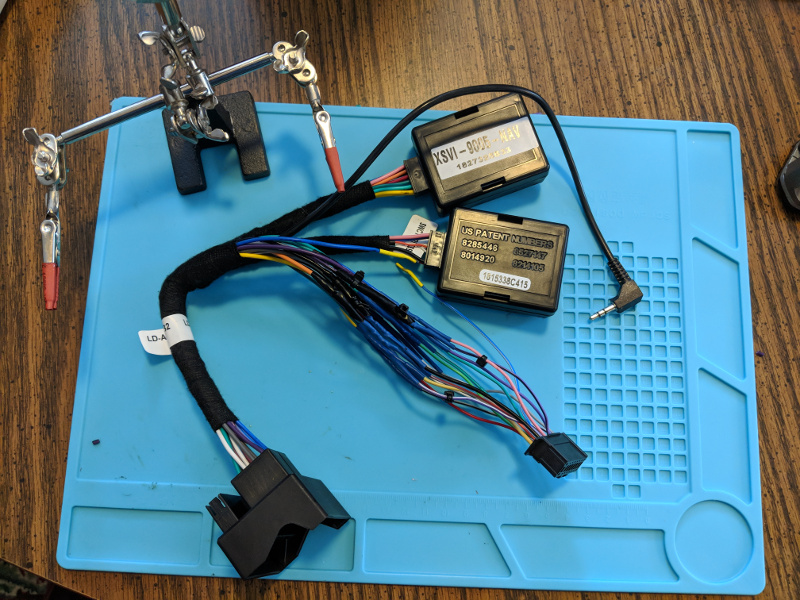
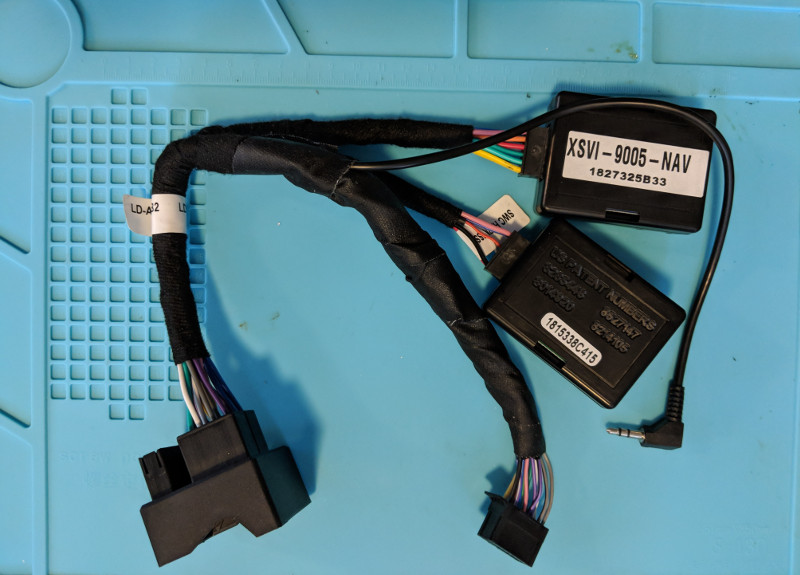
Next step, was to wire up the wiring harness that came with the Pioneer with the XSVI-9005-NAV wiring harness. This is the one that seems to work for Sprinter even though the manufacturer doesn’t specifically say it will work for 2018. So I just read the instruction manuals for each and then carefully mated up all the wires that corresponded. This is the final result:
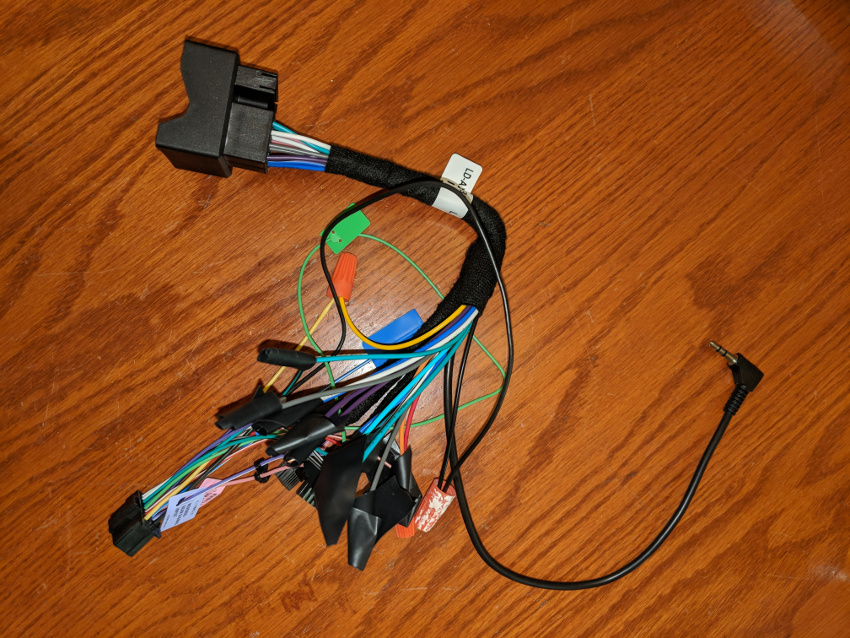
Just kidding! That is most definitely not the final result. But I decided to twist and tape up this rats nest of wires to do a “dry run” before spending hours making up a beautiful cable.
Also, after some more research I will be using the gps antenna that comes with the pioneer, which can be installed under the dash. Likewise I’ll use the microphone that came with the Pioneer. Sprinter has a built in mic, but I’m not sure its compatible. I purchased adapters for the backup camera and radio antenna, which are also listed below.
The gps antenna – I couldn’t get a good picture – but after popping off the two side panels and the panel on top of the radio, I mounted in the pocket on the dash. So its only visible if you peer in with a flashlight. Bottom line is, you can mount it anywhere either under the dash or on top – plastic does not interfere with the reception.
Then I took the captain’s table that is an option on the Unity CB, and layed it across the front seats so I could jury rig this whole unstable mess for a test before going any further. That looked like this:
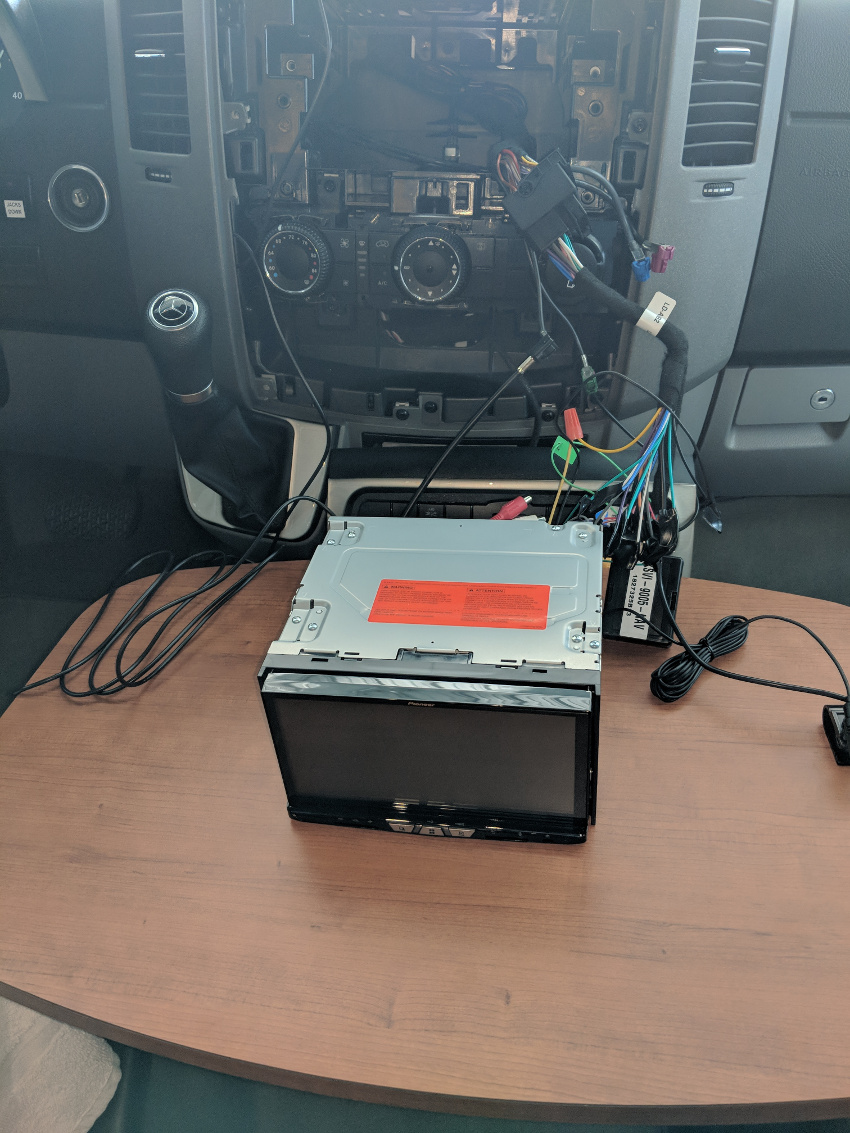
At this point I reconnected the vehicle ground. My heart was actually racing. I fully expected to turn the key to accessory and see smoke. It would have made for a great blog post!
But… it worked! I tested the gps, AM/FM radio, and the backup camera. The backup camera looks much better than before and I haven’t even set it up yet (you can program in the trace lines for your path.)
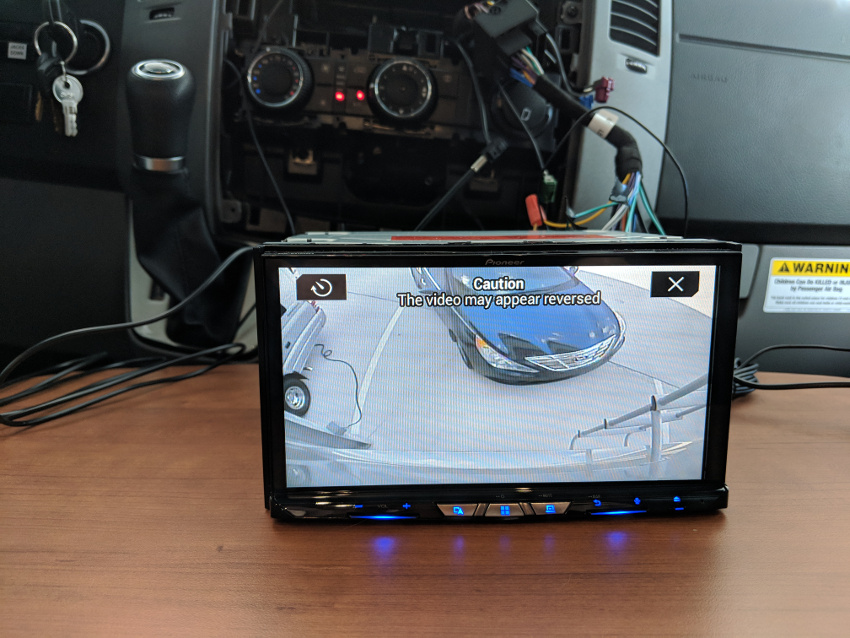

(I decided to not post the gps picture as it displayed the precise location of my brand new RV, lol.)
I still have a LOT of work to do next. But I’m feeling a lot better now!
Next step is, steering wheel controls. I don’t use them a whole lot, but having at least the volume working would be nice. I purchased the ASWC-1, but was a bit confused. It came with a wiring harness, and referenced a website for instructions, which of course stated that Sprinter 2018 wasn’t supported. So I downloaded the instructions for 2015 Sprinter…
Those instructions make no sense, and the wiring harness I have actually already has the ASWC-1 connector, so I started thinking that all I had to do was plug in the module and the thing would just work.
I called Axxess tech support, and to my astonishment a friendly guy answered on the first ring… He confirmed – yes, you just plug it in – no wiring required. Just discard the wiring harness that comes with this box. Dead simple. He did however say he had no knowledge of whether this would work on a 2018.
I didn’t have high hopes for the steering wheel controls. But it actually was almost plug and play. I followed the instructions for the 2015 Sprinter and just repeatedly hit the “up” volume control on the right side of the steering wheel until the light went out and then it auto-programmed. Besides volume, the up and down channel control also works but only when the steering wheel is set on “Audio”.
So next, I neatly soldered all the wires together. There is a reason that audio shops use splices and “butt” joints – they are very reliable, but even more importantly, fast and cheap. Soldering each wire and then covering with heat shrink tubing is slow and tedious but I can guarantee it will last 99 years.
So this is the final cable, with both the main module and the the Steering Control (ASWC-1) ready to plug and play:
Lastly, I just wrapped some friction tape over the Pioneer cable to protect everything:
Next up I mounted the Faceplate kit. I have mixed feelings about these. On the one hand its cheap and without this it would be impossible to mount the radio. On the other hand, both the first and the second one I received had factory defects, so I figure you might ordinarily need at least 3 to make a good set. At this point I just figured I could live with the minor defect and cobbled together one (almost) good one from the two on-hand.
The microphone I mounted on the visor as recommended, and concealed the cable pretty well by running down the door channel. That cable ended up being short, so I purchased a 3 feet 2.5 mm audio extension cable.
I also mounted a little dual usb cable receptacle on the bottom of the dash. As it stands I don’t think I will be using it as everything seems to work fine wirelessly.
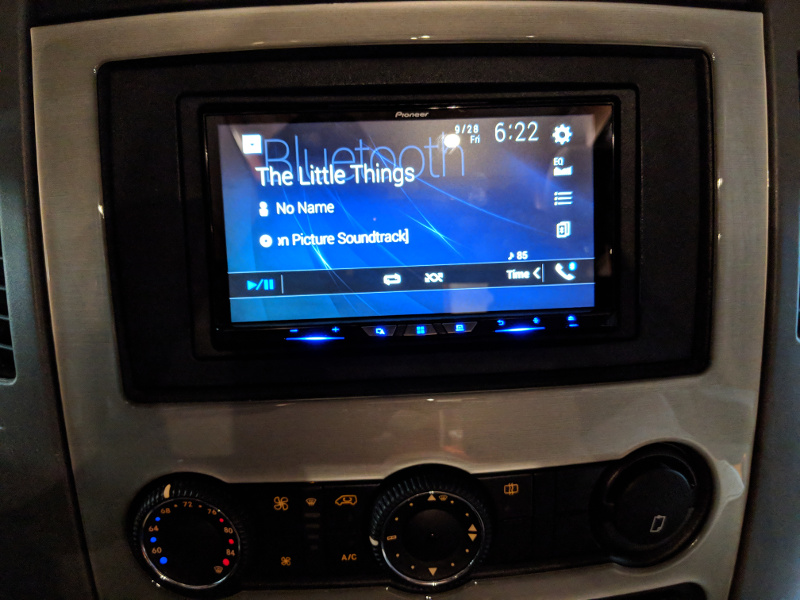
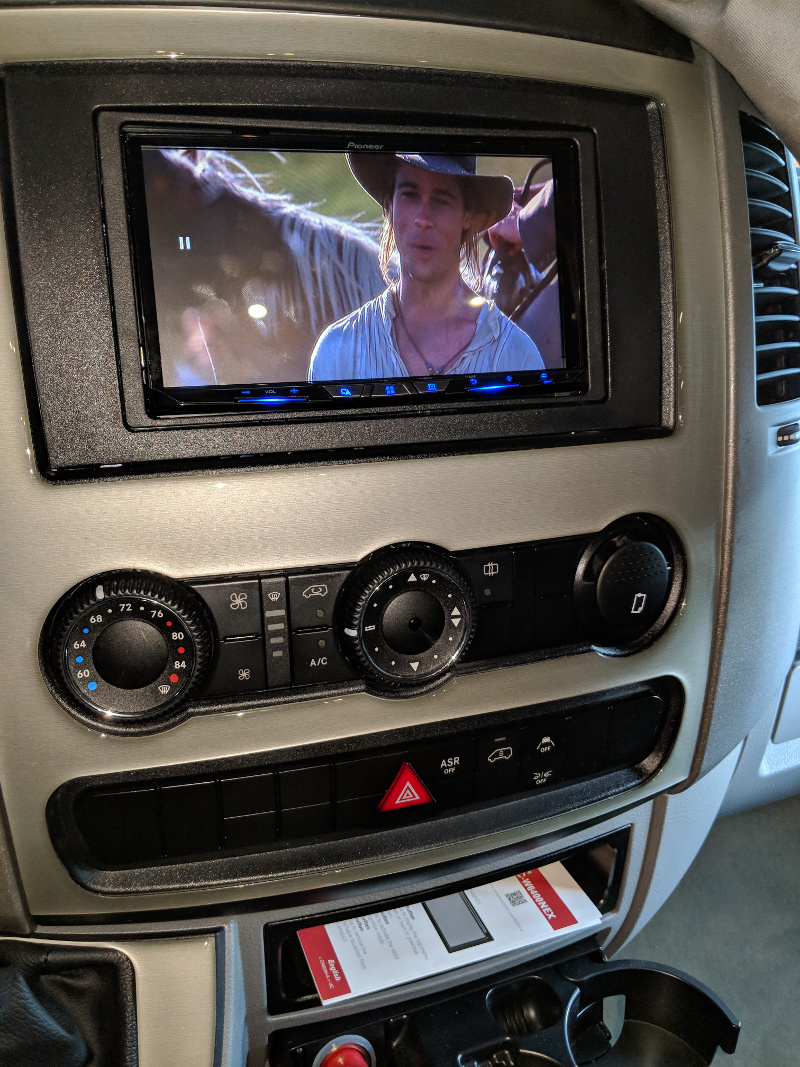
Final result looks pretty nice:
Finally I also installed the Sirius module and purchased a roof mount antenna. I ended up mounting the Sirius antenna on top of an aluminum box I mounted on the roof. This was for my “Mother of All Internet” project, but I figured if I was going to have to drill a hole in my roof I was only doing one!
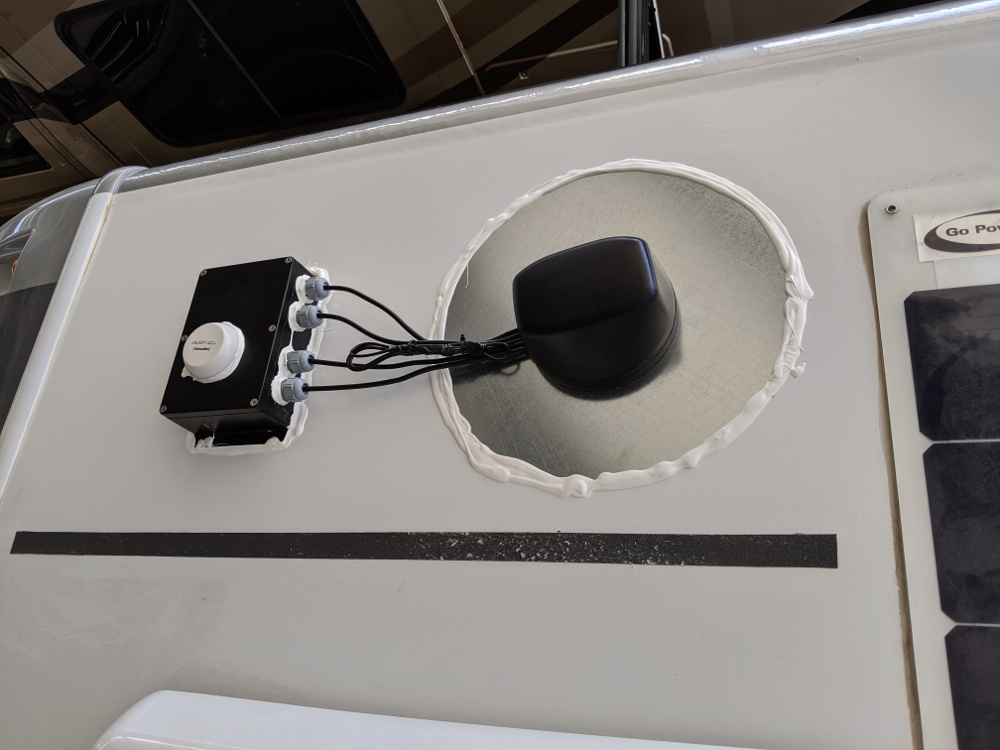
Putting the Sirius antenna on the rooftop box would let me easily change either that or the internet router antenna some future time without any more drilling.
Routing the Sirius antenna cable to the roof was challenging. I had to fish the cable inside the roof header to th entertainment cabinet. I did this by pushing a borescope up through the center console cutout on the roof. Then I took off the inside panel on the rightmost cabinet next to the entertainment console.
My wife stuck her hand through the opening and around the corner into the void. For clarity this is the cabinet to the far right as you look towards the Sprinter windshield.

WIth my wife waving her hand behind this cabinet I was able to thread the borescope right to her hand and then she tied a string to it to pull the cable through. I drilled a small hole in the entertainment cabinet to pass the cable to this adjacent cabinet.
So far I am pretty happy, but in truth I haven’t actually used it yet beyond testing. There are a LOT of screens and features, and it will take some time to work through everything.
Update Oct 11 2018: This thread was posted which shows a guy who just tapped into the Sprinter mic, and yes, it does work. I was pretty interested in that. Its a bit of a pain as you have to tap into the Sprinter side of the harness. (I was not really keen about soldering in the live dash). So I used these Posi-Tap connectors which I have had good success with in the past.
The same guy (Mitch) gave me a lot of other good ideas including powering up the Sprinter Antenna (otherwise the AM/FM performance will be disappointing) and a better idea for usb ports (more on that later).
So I initially tapped the microphone and powered antenna wire here. The mic is the purple/gray pair (purple is positive) and the black wire with the white stripe is the antenna power. (For my 2018 anyway, it is purple with a white stripe on older models). See this link for identification.
Then I used the 3 wire connector you see to connect to the aftermarket harness I made, which now has a mic jack and the power antenna wire connected.
It was a great idea, but when I tested it the Sprinter mic was horrible with the Pioneer, really not usable. I put an ohmmeter on my connection and it was good but the sound quality was terrible. So I actually abandoned this effort and went back to the Pioneer mic which I mounted in the visor and which sounds decent.
Finally Mitch also recommended a much more elegant idea for the usb ports, which I followed. One of them you can connect to the drivers side upper dash hidden factory connector by using the FAKRA (pink) to USB adapter. The other (or both, if you wanted, can go right in the dash by using these custom made inserts. Search Ebay for “NCV3 Sprinter (2007 – 2018) USB Port and Dash Adapter” which snap in to one of the button knockoffs in the dash.
Both look great, but the funny thing is, after all that they don’t work for me. Turns out the Pioneer has a known bug with Pixel 2 devices which use the newer USB-C connector as used on Macbook Pro. I got an error message on inserting and a google search revealed Pioneer only works with certain cables and not these for USB-C. It works fine for my IPad and I’ll never use USB ports anyway, so I just left them as is.
July 2019 Update: Pioneer issued a firmware update which seems to have solved the USB cable issue on Pixel 3’s. It now works fine with it, albeit at a lower charge rate than “rapid”. The firmware update just requires you to unzip some files and put on a memory card or stick. After the upgrade my Pixel 3 can use the usb.
The Pioneer is also pretty cool at playing cds or dvds. In the case of the later, you have to be stationary as its obviously somewhat suicidal to play dvds for entertainment while driving. Nevertheless, I googled around and found a few youtube videos on turning off that restriction via some secret commands.
I seriously doubt we would ever play dvds in the driving cab, but couldn’t resist testing it:
Update: Oct 25 2018
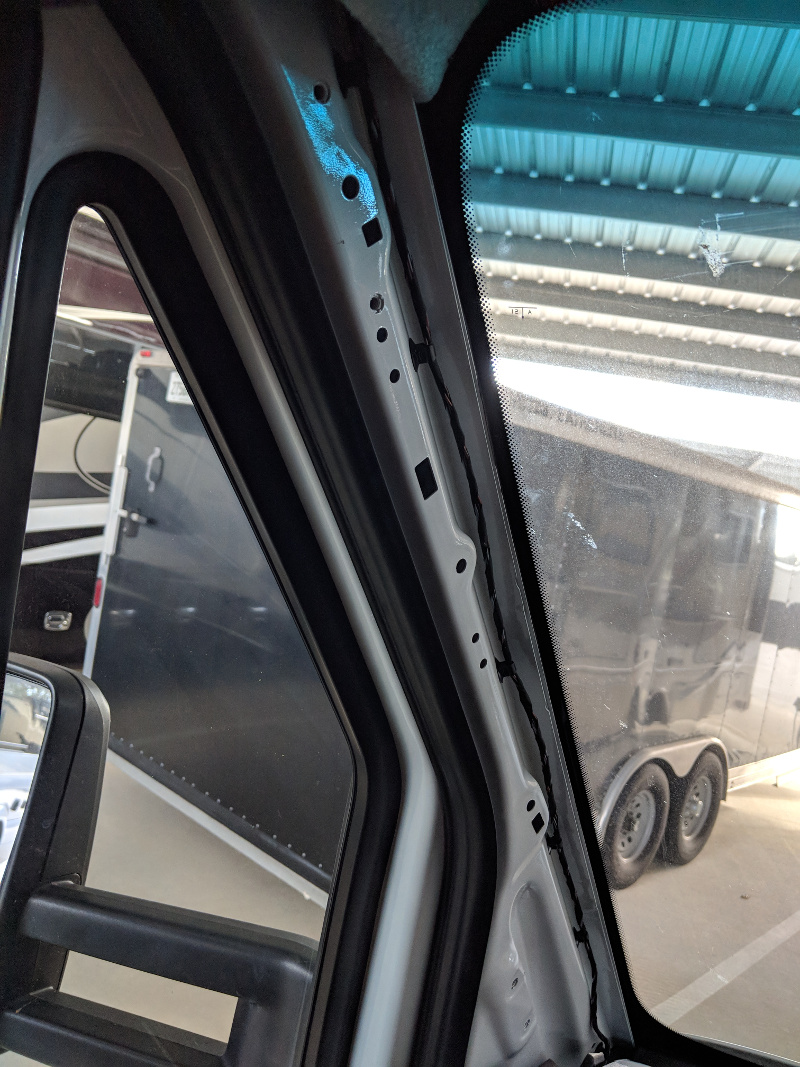
Since I only got good results using the included Pioneer mic, I went looking for a more elegant way to hang it. I had seen a post of one guy (different type of vehicle) who glued it in the overhead console replacing the factory mic and I was considering that. I don’t know why, but I thought fishing this up through the “A Pillar” and through the header would be time consuming, but it turned out to be laughably trivial. First, the “A Pillar just pops off. You pry a little from the top and it snaps out:
Next, to my surprise the little console on the ceiling also pops off – just squeeze the sides a little and wiggle:
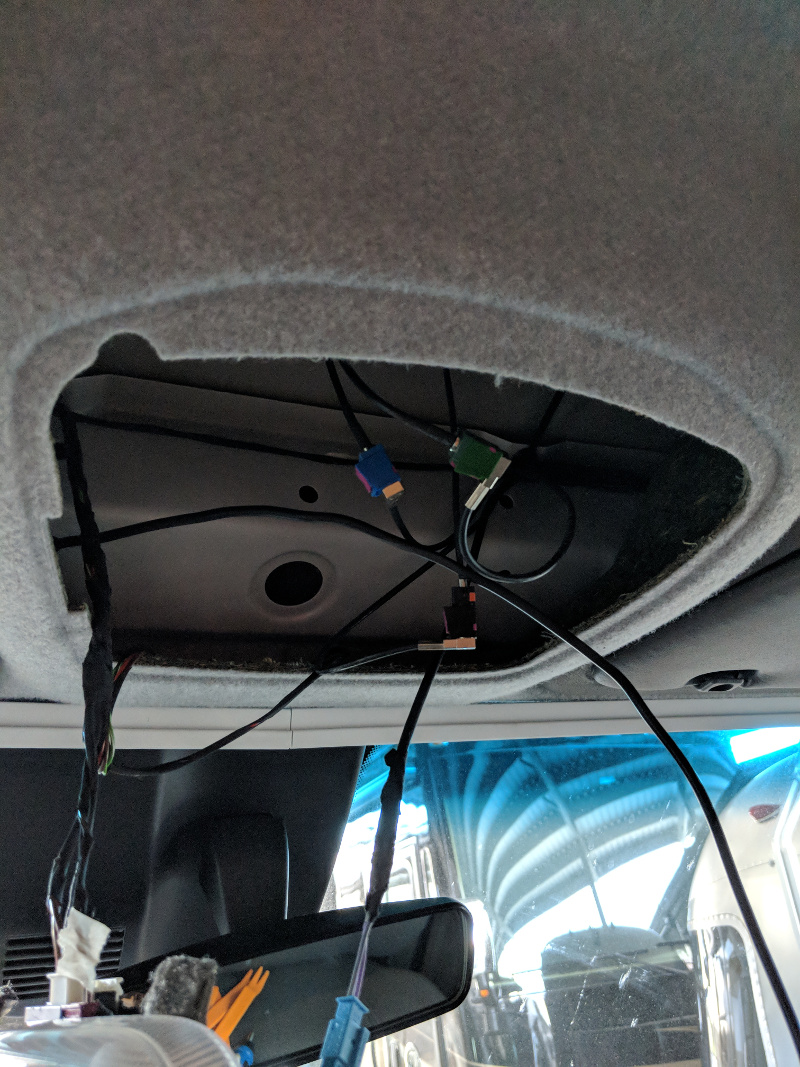
At this point it took about 2 minutes (if that) to fish the mic wire up through the dash, tie wrap it onto the “A Pillar”, and through the header into the cutout. I ended up just deciding to snap it onto the outside of this console:
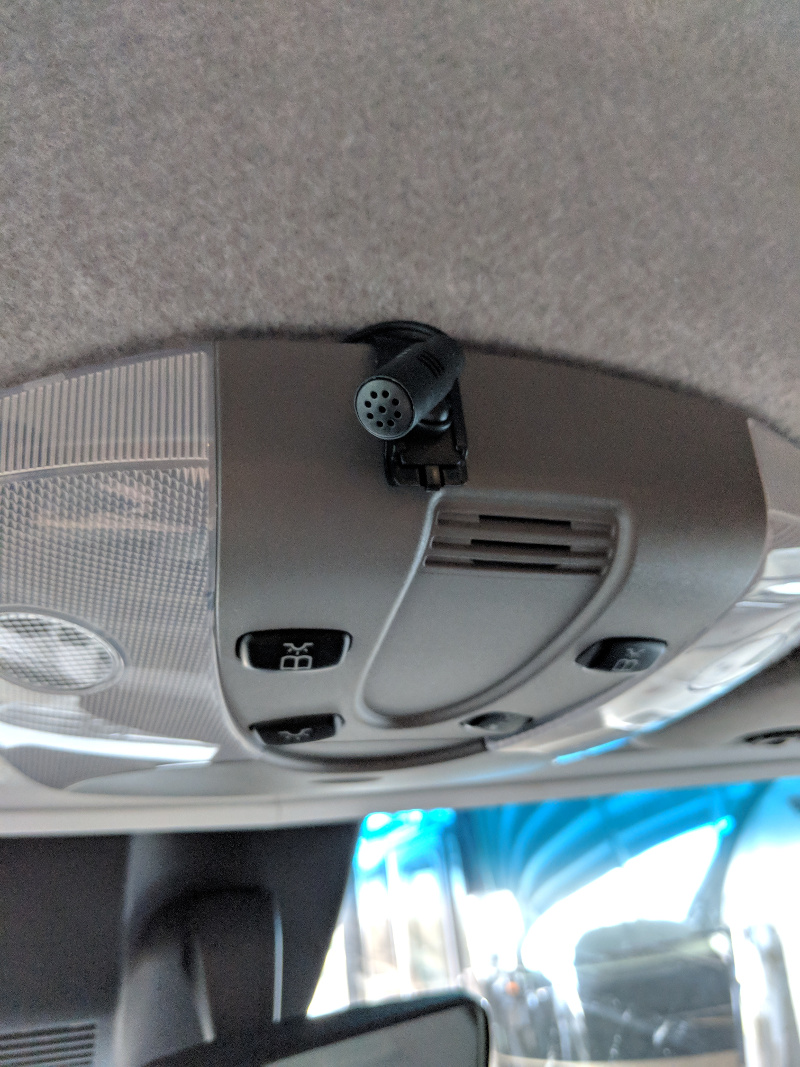
I don’t mind the slight non-oem look, and I appreciate that I can angle the mic exactly where I want it. If you are fanatical about the appearance of the mic, it could be easily concealed in where the original mic is mounted, but it didn’t seem worth the bother to me and that would put some plastic in the way. It seems to work well here.
Update June 3 2020: The Pioneer is still working great after many travels. As it was superseded by the 8500 it was a real deal on Amazon for a while for $600. Looks like the stocks have run out and sellers have raised the price so I have also included an 8500 link below.
I’ll post the links to everything I used:
(Paid Links)


Leave a Reply to Stephen T Cancel reply